Difference between revisions of "Rate Table Guide"
(→LS CO) |
|||
| (5 intermediate revisions by the same user not shown) | |||
| Line 4: | Line 4: | ||
| − | [[File:Rate Table Pic.png]] | + | [[File:Rate Table Pic 1.2.0.16.png]] |
| Line 50: | Line 50: | ||
| − | == How To change a | + | == How To change A Label == |
| + | |||
| + | Normally, if you try to change a label by writing over it, the program will prevent you from doing that. | ||
| + | |||
| + | To change a label, type the new label in the NewID bar and select the row you want to be changed | ||
| + | |||
| + | The program will then decide if it is a valid placement and it will replace the old ID with the new one. | ||
| + | |||
| + | |||
| + | [[File:RateTableNewIDGIF.gif|center|link=]] | ||
== How To Add More Positions == | == How To Add More Positions == | ||
Latest revision as of 22:09, 4 April 2022
This is a brief guide on How to use the Rate Table in the Estimating Template
After Clicking the Change Rates button in the Unit/Labour section of the EstToolTab Ribbon, A Table should appear

This table has 5 parts
| Category | PayRoll Type | Label | CM CO | LS CO | |
|---|---|---|---|---|---|
| Meaning | Job Description | Hourly or Salary | Job Abbreviation | CM Rate | LS Rate |
| Type | Word/Words | Hourly or Salary | short abv. | number | number |
Rate Table Column Explanations
Category
Contains a Description/Title of the Job/Position
Can be edited to any word/words
PayRoll Type
Contains the Type of PayRoll for the given position.
Can Either be 'Hourly' or 'Salary'.
to quickly type them, the user can simply input an 'h' or an 's' and upon leaving the cell, the Cell will automatically change to its given definition. 'h' -> 'Hourly' , 's' -> 'Salary'. You can try this out on the template
Label
This Contains a compressed, easy to type version of the Category/Position.
The given label is the identifier for the given position throughout the template.
They will appear in the Labour Class Column in Div's (Located in the Labour Man-hours section)
CM CO
This is the CM rate for the given position.
If the CM Rate checkbox is selected, Then this is the value used to calculate rows with this class selected
LS CO
This is the LS rate for the given position.
If the CM rate checkbox is not selected, Then this is the value used to calculate rows with this class selected
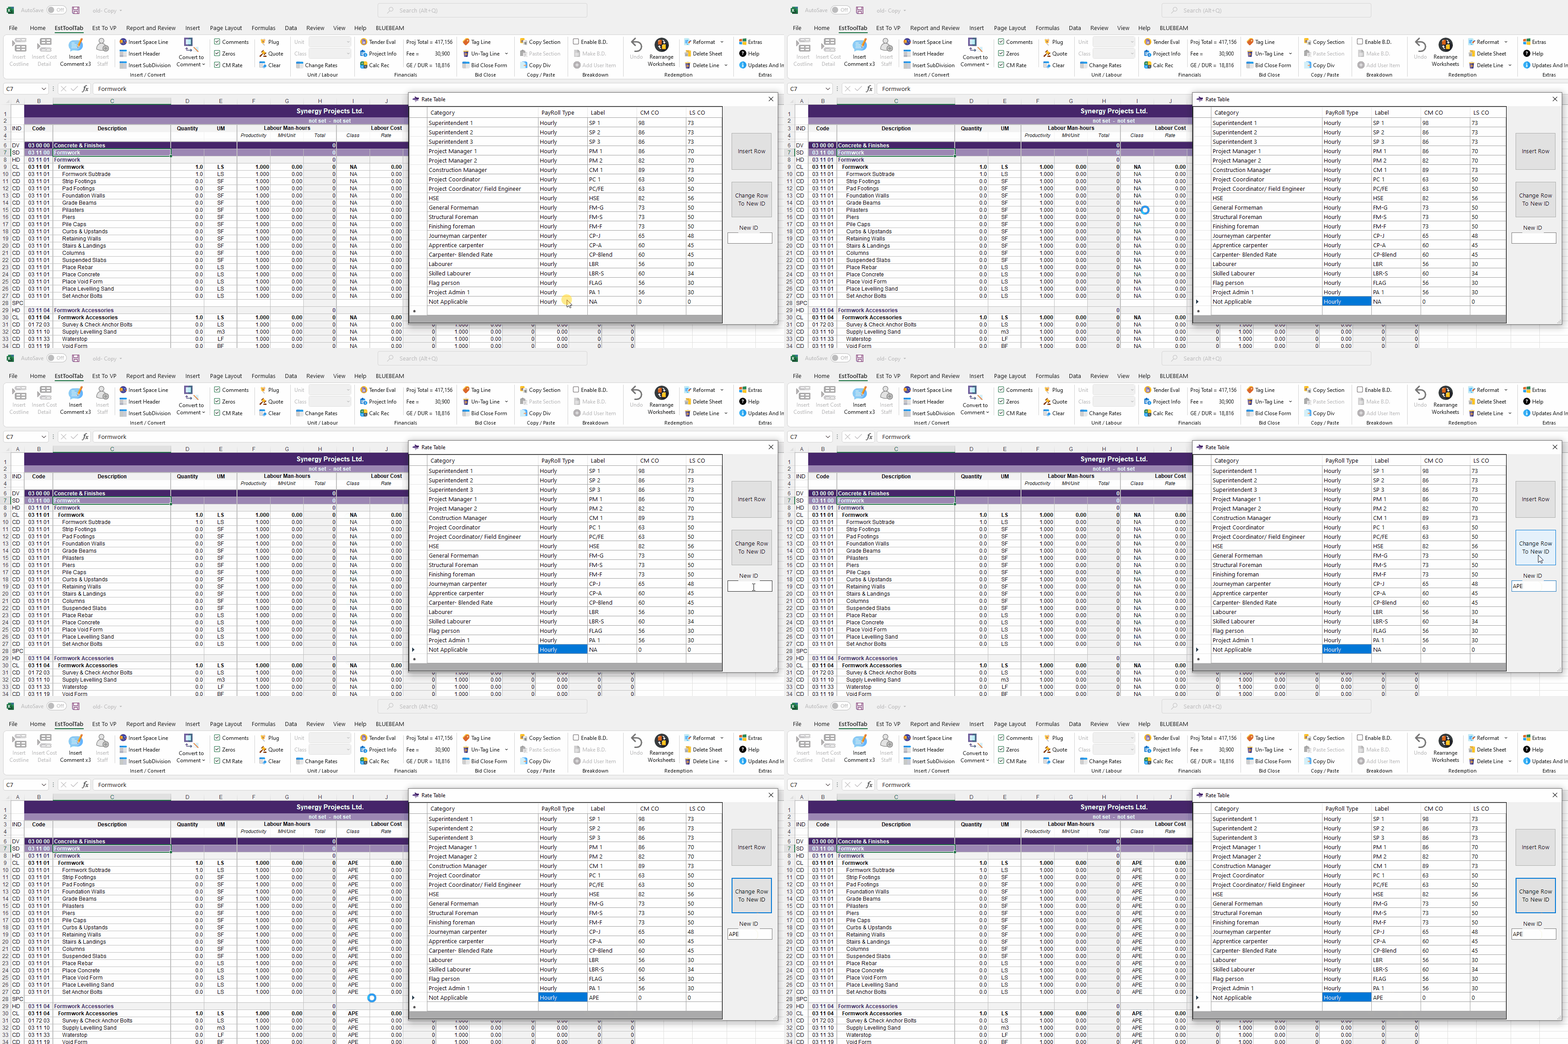
How To change A Label
Normally, if you try to change a label by writing over it, the program will prevent you from doing that.
To change a label, type the new label in the NewID bar and select the row you want to be changed
The program will then decide if it is a valid placement and it will replace the old ID with the new one.
How To Add More Positions
There are 2 ways to add more positions.
The First way is that at the bottom of the Rate Table, there is an empty line.
Start filling out that line and the new position will be created
The Second way is to select any cell on a given row and click the insert Row button.
This will insert an empty row below the row of the cell you have selected and the user can fill out this
empty row to add a new position
NOTE: with both methods, 1 thing is important. IN order for a new position to be added to the Rate Table,
The new Row must be filled out completely. So if you add a new row and just fill out the Category Column, this
data will not be saved and will be discarded. Only if a new row is created and all 5 columns are filled out appropriately
will the new row become apart of the Rate Table and Document.
How to Apply my Changes to the Workbook
Your changes will be automatically applied upon exiting the Form/Window
How to Remove Positions From the Rate Table
Removing positions that already exist is not currently supported.
Only adding new positions is supported