Difference between revisions of "Download Tutorial"
Siyuan wei (talk | contribs) |
Siyuan wei (talk | contribs) |
||
| Line 34: | Line 34: | ||
=== Step 2) Setting up the Software === | === Step 2) Setting up the Software === | ||
| − | Once the package has been downloaded, double click on the folder to access its contents | + | Once the package has been downloaded, double click on the folder to access its contents.<br> |
| − | Please note that the '''Blank Template is no longer included''' - it is currently managed and distributed by Estimating Team. | + | Please note that the '''Blank Template is no longer included''' - it is currently managed and distributed by Estimating Team.<br> |
[[File:FileContents.png|link=]] | [[File:FileContents.png|link=]] | ||
Revision as of 17:10, 8 August 2022
Online Based Downloading
This is a Guide on downloading the Estimating Software from the cloud
Step 1) Downloading the Files
To start, you must first download the files from the web. The files can be accessed from the button/link below
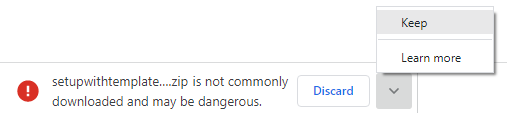
If you are downloading from chrome, a message like this might appear in the download bar

This appears because you are downloading software online and the computer
doesn't know if it is good or bad for the computer. (it's definitely good).
Simply press the arrow and click keep to continue
The Download process should take a few seconds at max
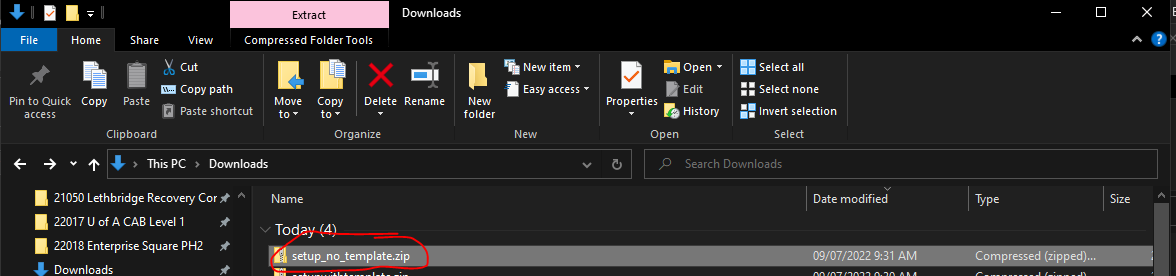
After the package has been downloaded, go to your downloads folder and the package should be visible
Step 2) Setting up the Software
Once the package has been downloaded, double click on the folder to access its contents.
Please note that the Blank Template is no longer included - it is currently managed and distributed by Estimating Team.

The Contents within this file may change over time but there are 3 main components.
- The Certificate
- The setup.exe
- The Blank Template
(It is also important to note that you should save and close all excel applications that are currently running if you have any before setting up)
We will first start with the Certificate
Initially, Double Click/Open the Certificate file
A warning might appear as shown below, simply press open to continue
File:OpeningCertificateWarning.png

After clicking Open, a Window should appear as shown below, This is the certificate signing Form.
The Certificate is basically a document that is telling the computer that the software is legitimate.

Click on Install Certificate

Another Window will then appear. This is the Certification Import Wizard
Make sure Current User option is selected (it should be selected by default) and then click Next
File:CertificateWizardBrowse.png

This next Page is asking where we want to store our certificate
This Time Select the "Place all certificates in the following store" option and click Browse
File:CertificateWizardSelectStore.png

Click the Trusted Root Certification Authorities and then OK
File:CertificateSelectionCorrect.png

Your Window Should look like the one above when done. Click Next
The last page is just an overview of what is going to happen. Simply click finish
File:CertificationWizardFinalizaton.png

A Security Warning as shown below will likely appear, click yes to bypass it

By now the import will hopefully of have been successful
To Check this we will need to refresh this window.
We can do this by first closing the Certificate Window.
Then re-open the Window by double clicking on the Certificate file again in our downloaded package.
Then head over to the certification Tab

When this tab is selected, the window will look like one of the two images below.
If it looks like the one on the left. We are good to move on to step 3. If it looks like the one on the right, redo Part 2 and follow the instructions carefully!


Step 3) Installing the Executable
Once the Certificate has been successfully added to your computer, we can finally install the software executable (the thing that does stuff).
First start by running/double clicking the setup file

A Pop-up will likely preventing the user from installing the software
To continue, click the "More info" link

Then click the Run anyway button

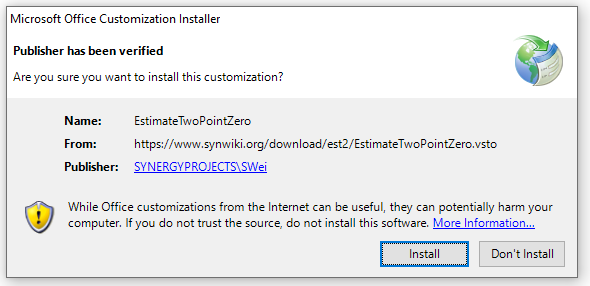
After that, there will likely be one more road-stop asking if we want to install the software.
The answer is yes, and you click the install button to continue. Installation shouldn't take longer than a few seconds
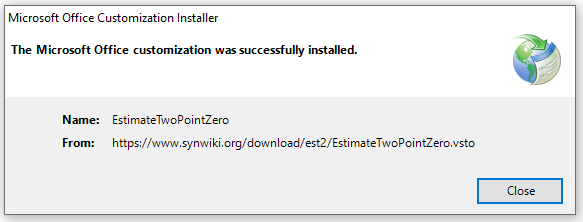
If All goes well, you should be met with a successful installation message like the one seen below. If you see this message, you can move on to the last step, step 4.
Step 4) Opening the Template
It is best practice to move the excel file out of the downloaded folder by clicking and dragging the file somewhere else before opening the file.
As long as steps 1-3 went successfully, the program should start-up upon opening the excel file and the template can begin to take shape!
See also Download Error messages to Troubleshoot
Troubleshooting
- Trying to download when already downloaded